
Perhaps you have been streaming for a while and want to take your brand to the next step. That is exactly how I was feeling when I decided to set up an online store. The problem was I did not have a way to make tees from home nor did I have the startup money to purchase the necessary equipment. Fortunately, there are a lot of options available to us in the form of eCommerce sites.
I began looking and was quickly overwhelmed with options. I started with a site called Teespring as they allowed me to print on demand, meaning there were no pesky minimums to get in my way for ordering. It seemed like it was going to work great, unfortunately, the print quality was unreliable. The tee I ordered faded almost completely after just 5 washes, but the tank top another customer bought is holding up just fine. This is when I learned of the different ways to print a tee.
There are multiple ways to print a tee. Heat transfer, digital transfer, embroidery, and screen printing. All have advantages and disadvantages but some print-on-demand sites do not tell you what they use. Upon researching the different methods I found heat transfer to be the cheapest but least durable and screen printing and digital to be among the more durable. Screen printing seems to be the best choice to avoid fading however it is the most expensive and many sites require minimums for screen printing. This makes sense considering the process involved. Since I did not want to deal with minimums I chose to go the route of digital transfer.
So which platform do you choose? There are so many options it comes down to personal preference and what kind of merch you plan to make. I chose to use Printful as it was an on-demand service, it offered both embroidery and digital transfer and most importantly it had integrations with online storefronts so you can easily transfer your items to your store. They have a handful of options for stores that work with them, however many of those stores had high monthly fees associated and I did not want that, but not SquareUp.
There are plenty of tutorials on how to design a website but many of them are not all-inclusive and many require several purchases across multiple accounts. In this tutorial, I will explain exactly how I created my eCommerce site. The tutorial will also cover how to make the two integrate and will include my recommended sites to use.
Setting up you ecommerce site for FREE
Setting Up Printful and Your Design
The first thing you need to do is find an on-demand product-fulfilling company. This is needed unless you happen to already own a t-shirt press or if you plan to invest in one and want to buy a bunch of plain tees to store in your home until you sell them.
The on-demand fulfilling company I use is Printful. They have fixed shipping costs, global shipping, no minimums, integration with your site, and best of all it’s free to set up an account! Unfortunately, as with any of these on-demand companies, your profits will be significantly reduced and your prices may have to be higher than if you were to go through a company with a minimum, that is the price to pay for on-demand services.
Use my referral link to earn $5
Once you have created a Printful account you can start designing products. Printful was pretty self-explanatory when it came to product design, though it was a bit overwhelming with the options at first. I found after purchasing a few samples that the Unisex Basic Softstyle T-Shirt | Gildan 64000 tee was the best for my comfort and cost (this is what I use for all my tees now).
The Unisex Basic Softstyle T-Shirt | Gildan 64000 tee was the best for my comfort and cost
Once I chose my tee it was time to upload my design. I draw using Procreate on my iPad so prepping the design was as simple as
- Create design
- Click “Copy Canvas”
- Create a new canvas 18″X18″ DPI of 300+
- Paste
Afterward, I would save the image as a PNG and upload it into Printful. Once uploaded I just resized the image to fit best on the tee (they have a grid view to see the printable area so be sure not to go outside of that).
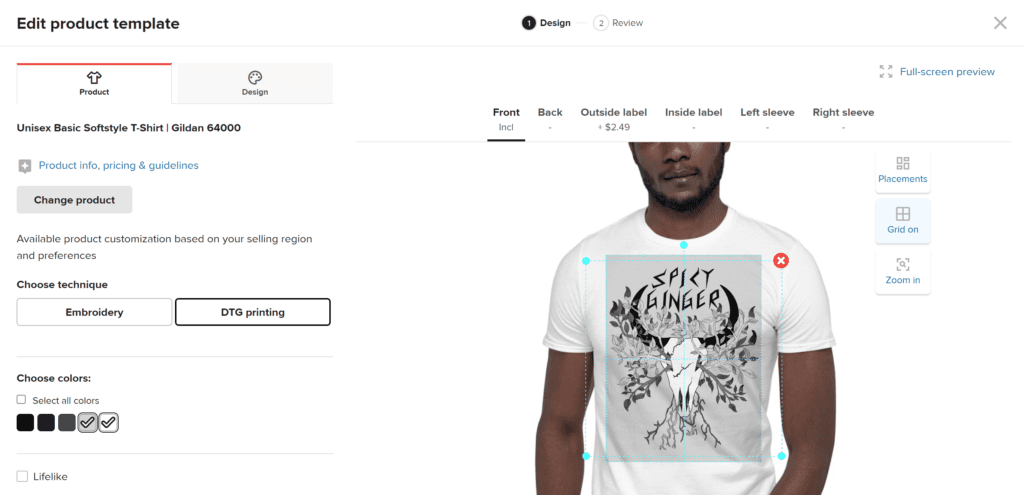
Once you are all done with that, save the template, and you are ready to send your item to your store.
At this point, you will go to the Stores tab on your Printful dashboard and you should see an option to choose a platform. If you already have a site choose the option that applies to you and follow the guide on their site. If you do not have a site already continue reading:
Setting Up SquareUp and Your Store
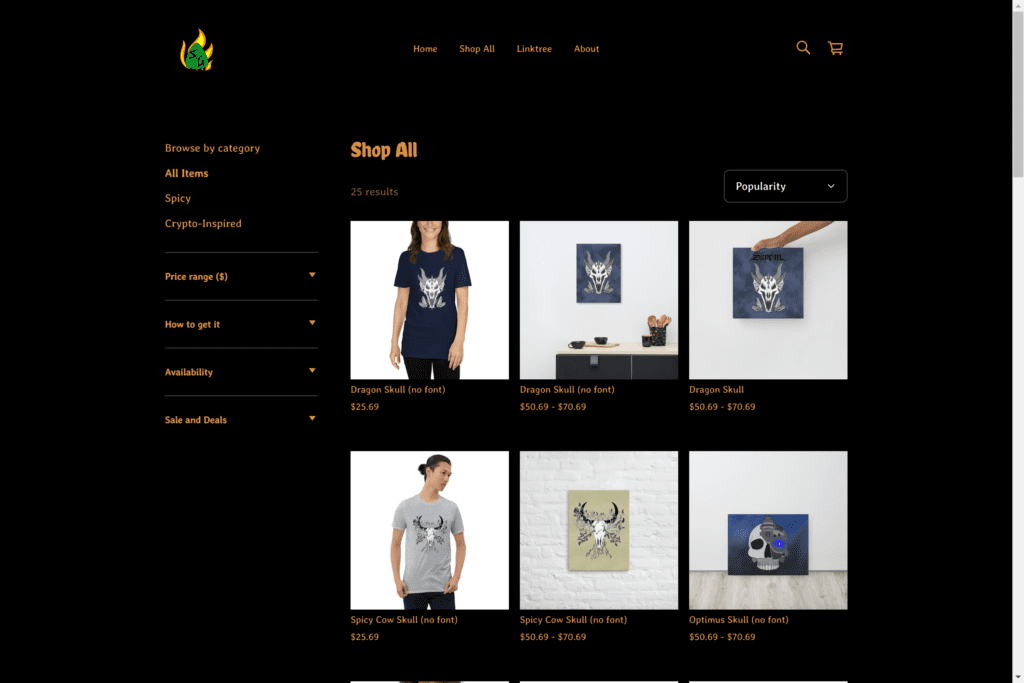
There are many different eCommerce platforms you can use. I tried several platforms before finding SquareUp. I found that SquareUp was very user-friendly and easy to set up as well as integrate with Printful which is why I chose it over the others. Most importantly though, I found that SquareUp was free as long as you use one of their subdomains!
Send some love and use my referral
When designing your store you can customize as much as you would like or feel free to simply fill in the blanks using the default template. You will need/should have:
- A logo
- A main banner image
That’s the bare minimum honestly, You can end it there, however, if you plan to have more than one product I highly recommend setting up a shop all page as well.
You can also build About Us pages, Contact Us pages, and even blog pages (they’re called Stories on SquareUp). I do not recommend using SquareUp for blog purposes though as their blog organization is not as good. SquareUp is great for online stores but not so great for blogs. If you want to build a Blog site I recommend WordPress. You can read about how I built my blog site in my next blog coming soon.
You can navigate the pages in the top left corner dropdown box and select and edit any or all pages you would like. You can add sections with “+add section” at the bottom of the left-side column and customize till your heart is content!
Once you have finished designing the site its time to set up your fulfillment settings
Make sure that your site is set up to ship by selecting the “Shipping” tab under Fulfillment. Connect your USPS, FedEx, and DHL (for global shipping) and build out your shipping profiles.
This part is a little tedious and one of the cons of SquareUp. The shipping profiles are very limited and you cannot have a custom (specific item) profile with different shipping rates for different locations. I have provided my shipping profiles for reference. I set up flat rates with different flat rates for different countries all based on the shipping prices from Printful listed here
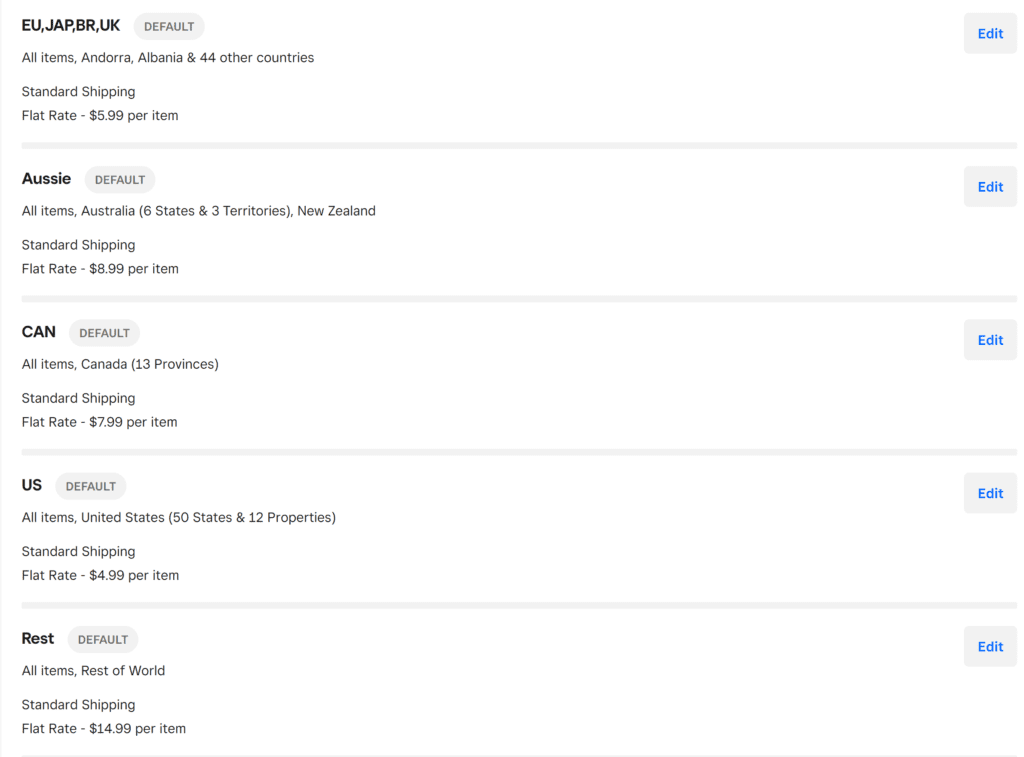
This worked great for shirts and hats but unfortunately, it did not work with my posters and canvas. As a result, I had to add a flat rate shipping cost for canvas and posters only, and then add the cost of shipping on top of the cost of the item. In other words, shipping is $15, but my shipping flat rate is 5 dollars and the remaining 10 is added to the price of the canvas. This is not ideal by any means but it is a workaround to keep your site free.
If you want to pay for it you can get real-time shipping updates…for $80/per month $$$$$$
Sending Products to Your Ecommerce Store
If you are using SquareUp go back to Printful and select the Stores tab from the dashboard and click “choose platform”. You will be able to select Square among the options and follow their guide to connect the two sites.
Once you are all connected it is time to send your awesome new product to your store.
Now go to the Product Templates tab in the dashboard. Here you will see the product you designed earlier. All you have to do now is:
Click “Add to Store”. Double-check the sizes and colors of the product, then choose some mockup designs for the posting. Keep in mind that while PNG files do take longer they may look better if your mockup does not have a background. Now decide on the cost
- Click “add to store”
- Double check the sizes and colors of the product
- Choose some mockup designs for the post. Keep in mind that while PNG files do take longer they may look better if your mockup does not have a background
- (Optional) Add a description
- Choose pricing (pay close attention to the revenue, this is still a business)
- Keep in mind that embroidery will charge an additional amount to digitize your image
Once you are done you can go to the Stores tab again and you should see your product pending. Once it has finished uploading you can move back over to your Square store to finish up.
Finishing Up and Troubleshooting
Your item should add to the store automatically, from there you can click on the item and edit anything you need, such as categories. Additionally, sometimes when an item is added the mockup image changes so you can drag the images around in the edit section. Just make sure the main image you want is the largest one at the top.
Troubleshooting
Items randomly show “not available” and sometimes display “nan” as price:
1. Double check to make sure that you have all of your prices listed (items -> site items -> click on item not working -> scroll through all variants of the product color and size to make sure everything has a price)
*NOTE this should not be the issue if you uploaded pricing when you imported from Printful
2. Make sure your location is marked ‘Physical” (home -> settings -> account setting -> business information -> locations)
3. Make sure you set up your shipping information (online -> fulfillment -> shipping)
*NOTE this was what fixed the issue for me
Items not showing up after syncing them from Printful:
1. Add the item manually (site items -> add item-> add item from library)
Final Thoughts
This is how I set up my website and it’s nice that I did not have to pay anything for it. That said free has its limitations. For one, I can not monetize ad space on the Square site and the shipping profiles are extremely limiting. Additionally owning a subdomain, while free is not as easy to find on search engines like Google. Overall this is a great way to start but you may find that you outgrow it fairly quickly. Either way free is free!
Stay spicy!
Pretty! This has been an incredibly wonderful post.
Many thanks for providing this info.